Bootstrap Header Form
Intro
Like in published documentations the header is one of the most important components of the website pages we develop and receive to utilize every single day. It safely keeps the absolute most crucial info regarding the identification of the organisation or else people behind the page in itself and the essence of the whole site-- its navigation construction which in turn in addition to the Bootstrap Header Class itself should be thought and crafted in this kind of method that a website visitor in a rush or certainly not actually understanding which way to see merely take a quick look at as well as discover the needed info. This is the ideal circumstance-- in the real life getting as near as feasible to this appeal and activity additionally goes on given that we almost each and every time have some project specified limits to take into account. Additionally unlike the written files on the planet of internet we should really always remember the variety of possible devices on which our webpages could probably get exhibited-- we should really make sure their responsive activity or else to puts it simply-- make certain they will display optimal at any display screen size achievable.
And so why don't we look and see specifically how a navbar gets developed in Bootstrap 4. ( read here)
Exactly how to use the Bootstrap Header Form:
Initially if you want to make a webpage header or else as it gets referred to within the framework-- a navbar-- we require to wrap the entire thing in a
<nav>.navbar.navbar-toggleable- ~ screen size ~.bg-*.navbar-light.navbar-lightWithin this parent element we need to initiate by placing a tab component which shall certainly be operated to display the collapsed content on a smaller sized display screen scales-- to perform that set up a
<button>.navbar-toggler.navbar-toggler-left.navbar-toggler-righttype = " button "data-toggle ="collapse"data-target = " ~ the collapse element ID ~What is definitely bright fresh for recent alpha 6 release of the Bootstrap 4 framework is that within the
.navbar-togler<span>.navbar-toggler-icon<a>.navbar-brand<div class="img"><img></div>Now-- the fundamental component-- designing the collapsible container for the main internet site navigation-- to perform it generate an element using the
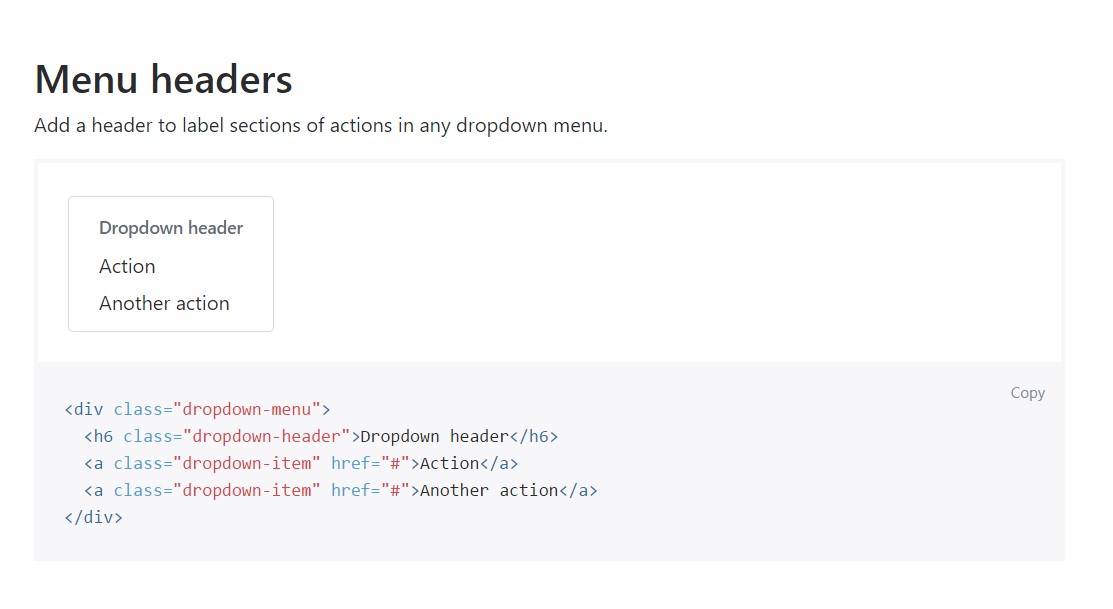
.collapse.navbar-collapseid =" ~ same as navbar toggler data-target ~ ".collapse<ul>.navbar-nav<ul><li>.nav-item<a>.nav-link.nav-item.nav-link.nav-item.dropdown<li>.dropdown-toggle.nav-link.nav-item<div>.dropdown-menu.dropdown-itemSome example of menu headers
Include a header to label sections of actions within any dropdown menu.
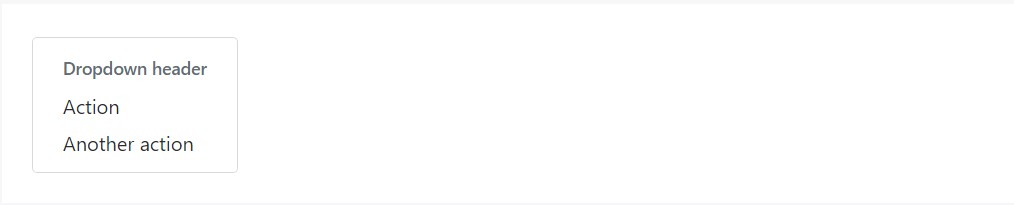
<div class="dropdown-menu">
  <h6 class="dropdown-header">Dropdown header</h6>
  <a class="dropdown-item" href="#">Action</a>
  <a class="dropdown-item" href="#">Another action</a>
</div>
More possibilities
Another brand-new factor for this particular version is the possibility to put in an inline forms in your
.navbar.form-inline<span>.navbar-textConclusions
As soon as it goes to the header items in the latest Bootstrap 4 version this is being really handled with the constructed in Collapse plugin and various navigation specified content classes-- a number of them built specifically for preventing your brand's uniqueness and others-- to create sure the real webpage navigating structure will display best collapsing in a mobile design menu when a specificed viewport size is accomplished.
Take a look at several youtube video information regarding Bootstrap Header
Linked topics:
Bootstrap Header: approved documentation
Bootstrap Header short training
Bootstrap 4 - Navbar Header application
